Posted on

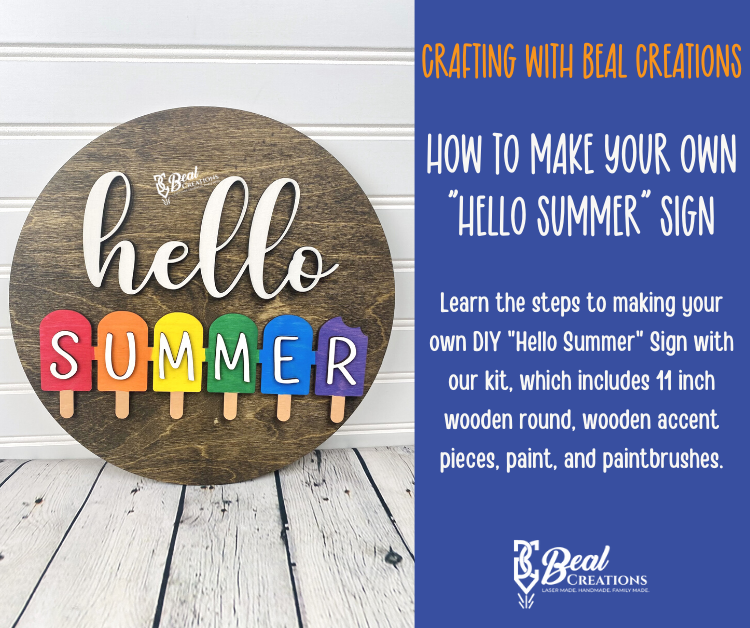
How to Make Your Own Hello Summer Sign

DIY Hello Summer Sign Kit Blog Cover 2

Despite how hot it has been, we are so excited for summer! We are welcoming summer with our Hello Summer sign and giving you all the details on how you can make your own with our DIY Kit.

What is in the DIY Hello Summer Sign Kit?

Our DIY Hello Summer Sign Kit will include all the wooden pieces you need to make your sign. We have also included paint for the accent pieces and paintbrushes. Here is everything you get:

DIY Hello Summer Sign Kit
All the pieces in your DIY Hello Summer Sign Kit
  • Wooden 11″ Round made from 1/4″ Baltic Birch wood
  • Wooden accent pieces, including
    • “hello”
    • “summer”
    • popsicles
  • Eight acrylic paints
  • Paint brush and foam brush

Two items not included are the paint/stain you choose for the 11″ round and glue. Some people like the stained round while others like it painted, choose whichever medium most fits your style. We recommend a strong craft glue or super glue.

Staining and Painting Your Sign

After you have collected all your supplies, ensure your workspace is properly set up and you have any necessary protective gear. Lay down some kraft paper or old cardboard boxes to protect your workspace, work in a well ventilated area, wear gloves, etc. Once you have prepped your work area and ensured you have all your supplies, you can begin crafting!

Start by staining/painting your wooden round. Never stained before? It is nothing to be intimidated about! Just make sure that you are going with the grain when you apply. Make sure to check out our DIY video to see how we did it. Once you are finished, place the round to the side to dry.

DIY Hello Summer Sign Kit
Go with the grain when staining wood

Begin painting your accent pieces. You can use either the paintbrush or foam brush included in your kit, or both! It is all a personal preference. My preference is to use the foam brush for all the pieces except “summer”. I like to use paint markers for small pieces like “summer”; however, if you do not have paint markers, I suggest using the paintbrush for thinner strokes on “summer.” I decided to use white for the words and paint the popsicles in a rainbow theme. There is enough paint included for you to do a couple coats of the same theme, or mix it up and do something completely different!

Assembling Your Sign

When all the pieces are fully dry, you can begin assembly. Glue the “hello” and popsicles onto the round. You will notice the light scoring on the wooden round; this scoring acts as a guide to help you align the pieces onto the board straight. Once these pieces are secure, begin attaching the “summer” onto the popsicles. Careful not to use too much glue as it will seep over the sides and leave residue on your sign.

If you chose the option with holes, gather your favorite twine or ribbon and lace through the holes and tie a knot. Your sign is ready to be displayed!

Excited to Welcome Summer

We are so happy to welcome summer in our house. We have undergone some changes and we are excited to begin this next chapter in our lives. We have been adding a whole slew of items to our summer bucket list. What is your favorite thing to do during summer? Tell us below, or feel free to share on our Facebook Page or tag us on Instagram, along with a picture of your beautiful new sign! We love seeing our customers’ creations!

Happy Crafting!

Posted on

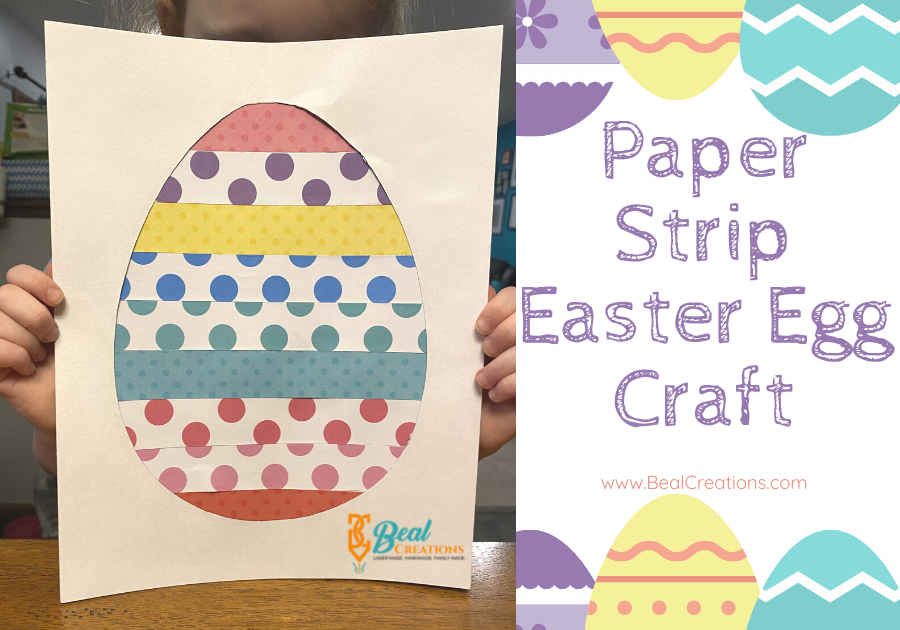
How to Make: Paper Strip Easter Egg Craft

Paper Strip Easter Egg Craft

Do you scrapbook and have tons of extra scrap pieces of paper? Are you looking for an easy Easter craft to do with your kids? This is Paper Strip Easter Egg Craft was an easy craft my daughter had a lot of fun doing, and I already had everything I needed in my house.

Paper Strip Easter Egg Craft

Whether you scrapbook or not, this is a great craft for your kids to complete during Easter. You can easily use pieces of construction paper instead of scrapbook paper. You can also have your child draw lines and shapes with several different colors of markers on a whote piece of paper and cut it into strips. You could even use strips cut from magazines – really anything that will give you an array of colors.

Paper Strip Easter Egg Craft

Between my passion of scrapbooking and our business, I have so many pieces of scrap paper it is a little insane. Anyone else just CANNOT throw away scraps? I know they can be used for something some day and I do not want to be wasteful. Thankfully, just as my pile was getting a little too out of control, Easter started to sneak up on us. These scraps are perfect to make fun, multi-patterned paper Easter egg crafts.

Supplies You Will Need

  • Strips of scrapbook paper (or one of the alternatives mentioned above)
  • One piece of white cardstock paper
  • Egg outline printed on whote cardstock paper (see below)
  • Scissors
  • Glue stick
Paper Strip Easter Egg Craft Supplies
Supplies

How To Make a Paper Strip Easter Egg Craft

  1. Print the egg outline (template found below) on a piece of white cardstock paper. You can also print on colored paper or regular white printer paper if you choose. I like cardstock because it is a little sturdier and I wanted white paper so the colors of the paper strips would pop.
  2. Cut the egg out of the paper, leaving an egg shape in the paper. This will be your top layer of your craft.
  3. If your patterned paper is not already cut in strips, do that now. The size of the strips is personal choice, but they need to be at least as long as the egg ooutline so as not to have any white gaps. My strips were about one inch wide.
  4. Let your child begin laying down the strips on the full piece of white paper. Have them glue them down to the paper after they are happy with their pattern.
  5. Once all the strip are glued down, put glue on the egg outline cutout paper. We put glue on the side with the black outline, that way no black lines would show on our final piece. Place the paper on the paper with the strips.
  6. Your child can write a Happy Easter message on the final art piece if they like.

Share the Love

Once your child has made their own Paper Strip Easter Egg Craft to hang on the fridge, they can make more for family! We also made a smaller version we can fit in envelopes to send as Easter cards to grandparents. What else would you do with this fun craft?

If your child completed this craft activity, we would love to see their masterpiece! Feel free to share a picture on our Facebook page. Don’t forget to follow us on Facebook and Instagram for more craft fun!

Paper Strip Easter Egg Craft Silly Girl
My silly girl <3

Happy Crafting!

Posted on

Safety Vehicles Paint Kit – A Fun Addition For Safety Themed Lessons

Safety Vehicle Paint Kit - Blog

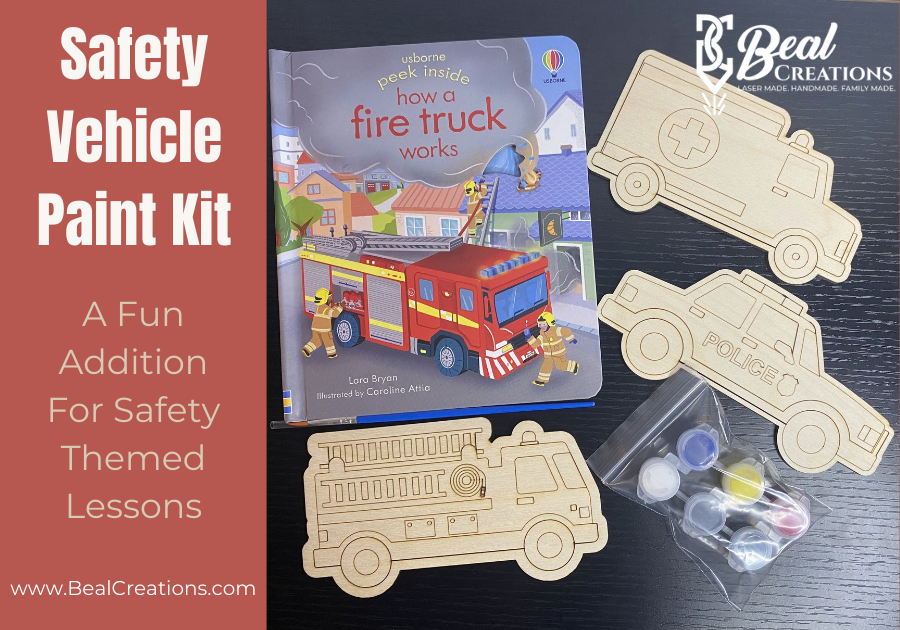
We have been homeschooling our daughter and this month’s theme is all about safety and emergencies. Our daughter loves art and we love to mix fun activities into our lessons, so we decided to make this Safety Vehicles Paint Kit. It is the perfect addition to spark creativity while creating engagement in your lesson.

Benefits of Hands On Learning

Solely reading books and doing worksheets for class can be quite boring and under-stimulating. Hands on learning is necessary to provide well rounded education and keep your learners engaged and focused. When a child is engaged in their learning, it leads to better retention and a desire to learn.

When a child engages in a learning activity that involves multi-tasking, for example talking and painting, it increases the opportunities for both sides of the brain to be stimulated and develop. This is critical as the right side of the brain, which is known as the creative side, develops first, when children are around four years old. The left side of the brain, known as the logical side, does not develop until years later, between seven and ten years old. Providing activities which cause them to use their right side of the brain while keeping them engaged through creative exercises will lead to better experiences with learning and therefore an interest in learning. You will be able to grow their analytical and language skills while expanding their personal creativity.

How to Incorporate the Safety Vehicles Paint Kit into Your Lessons

One of our most loved ways to incorporate hands on activities with out lessons is with books. Each day we read a book related to our theme of the day. Most of the books we read are either from the library or Usborne Books & More, since I am a representative. Our daughter absolutely loves the flap books, so I knew “Peek Inside How a Fire Truck Works” was going to the perfect book for our fire safety day. The lift-the-flap books keep her engaged since she has to listen to the content, then lift the flap to keep the story progressing.

As our daughter paints the fire truck, I leaf through the book again and we talk about things we read. This both helps test her knowledge and better retain information she may have missed the first time. Depending on the book, I may read the whole story to her while she is painting. The simple act of doing something with her hands (sparking the right side of her brain) and listening to the story (sparking the left side of her brain) helps provide that well-rounded lesson that develops her brain more efficiently. You can get your safety vehicles paint kit here. It comes with a wooden ambulance, police car, and fire truck to paint, as well as six paints and one paintbrush.

Safety Vehicles Paint Set

Additional Safety Lesson Resources

Some other books you may like to include in your Safety Unit are “Dial 911”, “Be Careful and Stay Safe”, “How Do Dinosaurs Stay Safe?”, “I Won’t Go With Strangers”, and “Once Upon a Dragon: Stranger Safety for Kids.” I was able to find all of these books at my local library.

I also made a couple worksheets that we worked on together. One was a visual worksheet pictures to circle which were an emergency. The second was to discuss important information to know in case of an emergency. Since our daughter is also practicing her writing skills, she wrote some of the information herself, but I wrote the longer answers. There is also a shape matching game I made where you look at each safety sign and match which shape it is. You can cut these out on cardstock and laminate them to give them a more sturdy and long-lasting effect.

All of these worksheets I created are available to you for free for download below.

Importance of Safety Units

It is critical that even young children know the safety basics, so make sure you are giving them small tidbits of information when you can. It can be as simple as acknowledging stop signs when you are on walks or even acknowledging your street sign and reciting your address. It is easy to fit in this vital information throughout the day without formal, sit at a desk lessons. Be sure they know what qualifies as an emergency and what they should do as an emergency. They need to know who they can turn to for help should you not be there and be able to provide information which identifies who they are and who you are should they be lost.

Safety Vehicles Paint Kit Fire Truck

Happy Learning!

Posted on 8 Comments

January DIY Craft Kit – Winter Wonderland Snowman

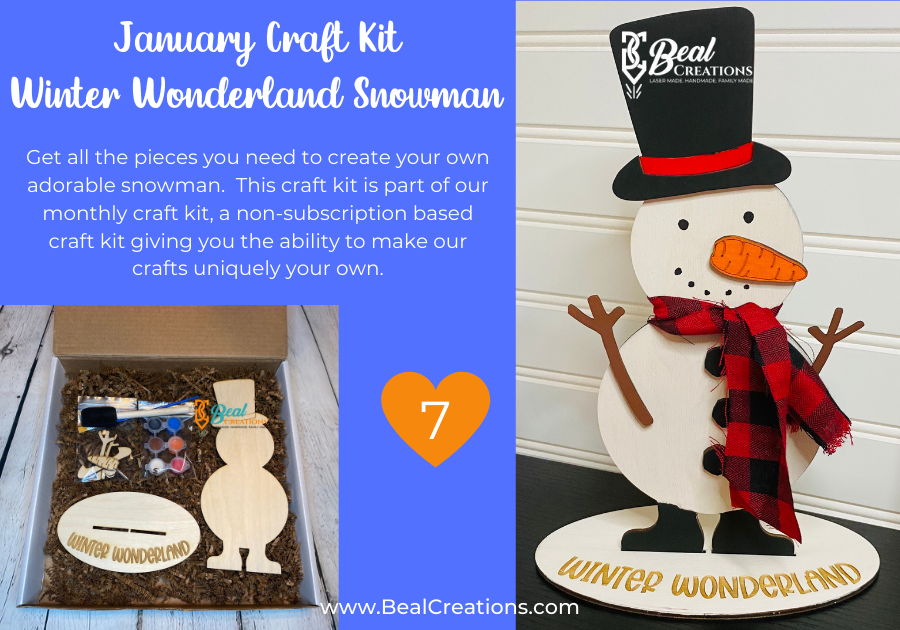
This month’s DIY craft kit is the Winter Wonderland Snowman. Get everything you need to make your own snowman at home. This is a fun and easy craft for older kids and adults.

One DIY Craft Kit – All Your Supplies

First, order your January DIY Craft Kit. When you receive your box, unpack all of your pieces to make sure you have everything. Your kit will include:

  • Snowman
  • Hat brim
  • Carrot
  • Three buttons
  • Two branch arms
  • One fabric scarf
  • Six acrylic paints
  • One foam brush
  • One paintbrush

One thing your kit will not include is glue. You can choose whatever glue you feel safest using – the tacky glue which you can find at Wal-Mart works great on DIY projects. Whichever glue you chose to use, please use caution. While this craft is great for both adults and older kids, please ensure adult supervision if being completed by a kid.

Painting Your Snowman

Begin by painting your snowman. You can paint a traditional snowman, like mine, or feel free to use other paints or mediums you have at home to make something truly unique. After painting the snowman, paint the trim of the hat, which I painted red to pair with the red in the scarf. Then, paint the hat and boots.

When finished with the snowman piece, begin painting the rest of the smaller wooden pieces. Set everything aside to dry.

You can also decide to paint the base, or leave it natural if you like the wood look. For my piece, I painted the base white. If you take the foam brush and just lightly paint over the engraved words, the paint should not seep into the engraving. I was going to fill in my engraving with blue paint, but I ended up liking the engraved wood showing through and decided to leave as is.

Assembling Your Snowman

Once all of the wooden pieces are completely dry, you can begin gluing them together. How and where you attach each piece is your choice, for example, maybe you want the branch arms pointing down. When you have each piece attached, find the fabric piece. This will become the snowman’s scarf. I folded my fabric in half length-wise, then tied it around his neck. I only knotted it once, since this is a décor piece and it doesn’t need to be on tightly. You may also decide to cut the ends to give the scarf some fringe.

At this point, you can paint or draw a face on your snowman, if you want. I used our Posca Paint Pens, but you can use the black acrylic paint that came with your project or even a normal marker.

Check out the video below to see a quick step by step of how I made my own snowman.

Your New Winter Friend

You are now ready to stand your snowman up by placing him in his base. The snowman stands approximately 10-inches tall. He is such a cute addition to our shelf. Since he is not Christmas themed, we can keep him up all winter. In Ohio, that can last awhile…it has snowed on my birthday in past years…in APRIL! That’s a little too long of a winter for me.

Once you have completed your Winter Wonderland Snowman, I would love to see it! Make sure to post a picture on our Facebook page and let us know you have completed the Monthly Craft Kit. We really enjoy seeing everyone’s creations. If you are looking for more inspiration for future crafts, be sure to follow us on social media.

Happy Winter!

Posted on

Paper Plate Santa: Free Kids Craft Project

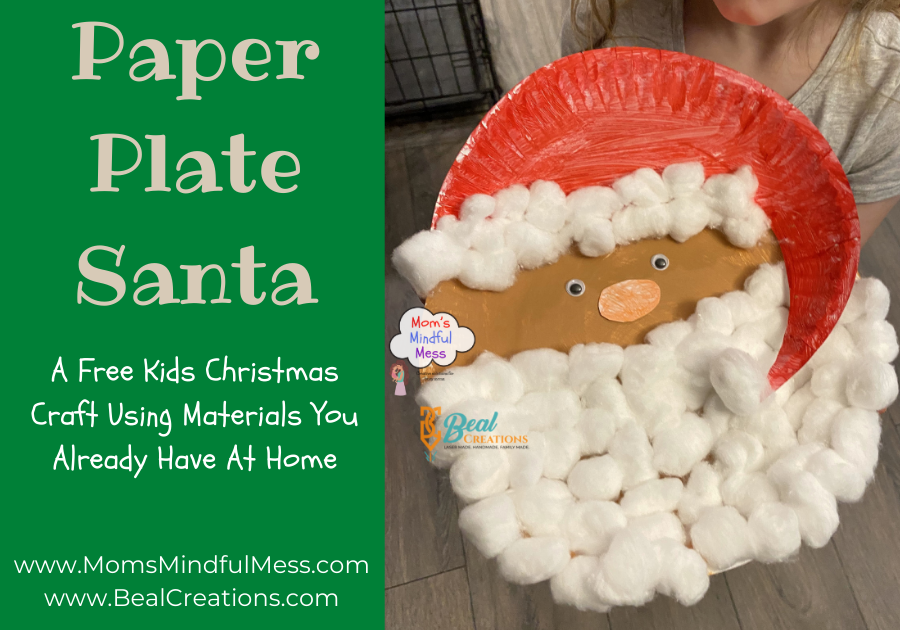
Paper Plate Santa

Looking for a fun and free craft project to keep your kids busy? This Paper Plate Santa craft uses materials around your home to help you save a few dollars of your Christmas budget while giving the kids something fun to do so you can check your list twice.

Needed Materials for the Paper Plate Santa

Paper Plate Santa Supplies
  • Two white paper plates
  • A few handfuls of cotton balls
  • Red paint
  • Peach paint
  • Black marker (or googly eyes)
  • Scissors
  • Glue

How to Make Your Paper Plate Santa

DISCLAIMER: Parental supervision is required with all projects. I hope you enjoy the quality time creating memories together!

  1. Cut one of the paper plates in the shape seen in the photo above under materials needed. Leave the second paper plate whole.
  2. Paint the whole paper plate a peach color – or any color you choose to represent the skin of Santa. Set aside to dry.
  3. Paint the cut paper plate red. Set aside to dry.
  4. Once the whole paper plate is dry, drizzle some white glue on the bottom half and stick on the cotton balls. This represents Santa’s beard. Reserve some cotton balls for Santa’s hat.
  5. Once the cut paper plate is dry, glue it on to the top of the whole paper plate. This represents Santa’s hat. Make sure to leave enough space between the hat and the cotton ball beard to make Santa’s face.
  6. Drizzle a line of glue across the bottom of the hat and attach cotton balls. Glue one cotton ball to the point of the hat.
  7. Use a black marker to make Santa’s eyes and nose. Alternatively, you can also use googly eyes, construction paper, or anything else you have on hand to be creative.

Watch our quick video below of our daughter making this project to get a visual of each step.

Santa Traditions

Once your Paper Plate Santa is all dry you are ready to display him. He can be a nice reminder to your kids that Santa is always watching so it is important to be on your best behavior.

Do you have any Santa traditions you follow each year? We make sure to visit Santa each year and always write him a letter. We send the letter via our post office and always receive a letter back, which our daughter really gets a kick out of. Of course, we leave Santa cookies and milk, and carrots for the reindeer. I am so excited to use our new personalized Santa Board this year. We plan on surprising her with it on Christmas Eve. I know she is going to be excited to see her name on it when we give it to her.

Personalized Santa Board

Share your traditions and/or finished Paper Plate Santa crafts below or on social media – make sure to tag us @BealCreations. You can also find other fun kids crafts and activities on our sister site Mom’s Mindful Mess. We hope everyone has a wonderful holiday and able to spend quality time with family.

Happy Holidays!

Posted on 8 Comments

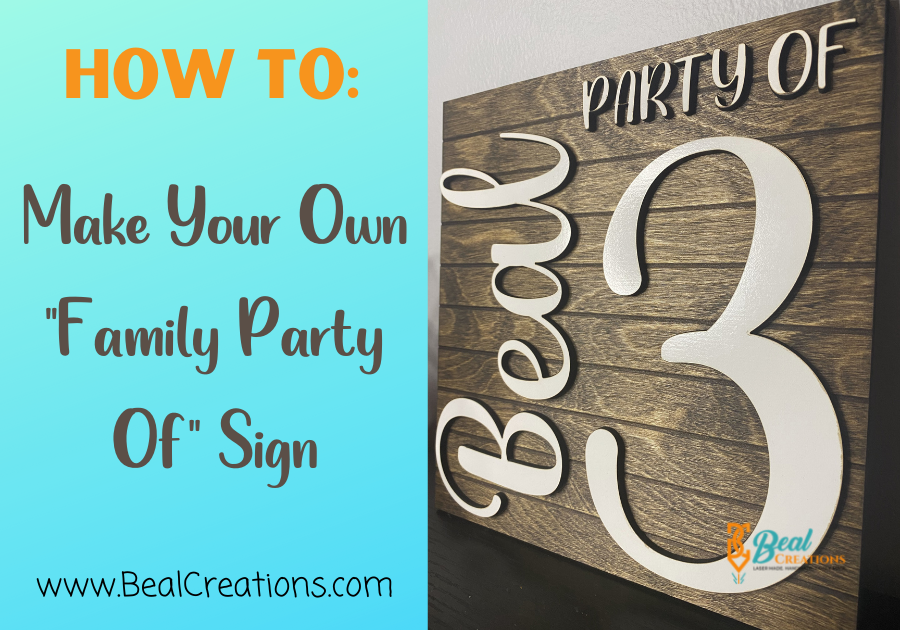
How to Make Your Own “Family Party Of” Sign

How To Make Your Own Family Party Of Sign

The “Family Party Of” signs and hashtags have become very popular over recent years. I love their use in pregnancy and birth announcements. Since there are not that many elements to this design, I decided to make one myself and show you all how you can make one for your home as well.

This post contains affiliate links. If you use these links to buy something we may earn a commission, at no cost to you. We only recommend products we use and like. We hope you like them, too! Happy Shopping!

What Materials Do You Need for Your “Family Party Of” Sign?

Thankfully, the materials list for this popular home décor piece is not long. You will need the wood you want for the backboard, your letters, and your number. Other than that, choose if you want the wood unfinished, painted, or stained, grab a paintbrush or a cloth, some glue, and you’re ready to get crafting!

With our Family Party Of Sign Kit, you can get all the wooden pieces needed. There are a few choices for your backboard: flat wood, whiteboard, blackboard, or shiplap style wood. The white and blackboard would essentially be a finished product, as you would not paint or stain them. The wood, whether flat or shiplap, you would have the choice of leaving unfinished or staining/painting your choice.

How To Make Your Own Family Party Of Sign (2)

The same options are available for your letters and numbers, with the exception of the shiplap option. It is nice to get the letters/numbers in the white or blackboard option since it would be less work for you. Of course, if you prefer them unfinished or a different color, the wood is easy to finish yourself.

Stains are easy to find in any hardware store. We use Minwax; the one in my video is the Dark Walnut color. We use acrylic paints in our home décor projects, which you can find in your local craft store. If you are looking for a large supply of acrylic paint, I would recommend Sargent Art brand. Note: This is not the same paint I use for kids crafts, for those I use washable Tempera paint. I recommend using super glue for this project, but please use caution regardless of which brand you use and read all safety directions on the package. No one needs to glue their finger to their project, hahaha!

Steps to Making Your “Family Party Of” Sign

The first step is to decide your theme, or style. Do you like the farmhouse style or more modern? Do you want a large sign, or something as a small accent? Once you have decided what style fits your home, order your wooden pieces as a complete set or buy your square or rectangle backboard, letters, and numbers separately.

Before you begin, you can watch this quick video I made while making my own Family Party Of Sign.

Once you receive your wood, begin by painting or staining your backboard, if that is what you have chosen. For the paint, wait at least two hours after you have finished painting to make sure it is dry before gluing your pieces on the board. If staining, decide how dark you want your stain. Follow the instructions on the can to get the right color you want. My method for the dark walnut was to use a cloth to apply the stain, wait a couple minutes, then wipe off any excess stain with a clean cloth. I only waited a couple minutes because I did not want the color too dark. If you decide the color is not dark enough after you wipe away the excess, you can begin the process again until it is the color you want. Again, wait at least two hours after you finish before gluing your pieces onto the board.

While your backboard is drying, you can paint or stain your letters if you did not get the white or blackboard letters. Once everything is dry, you can begin gluing down your pieces. If you bought the “Family Party Of” Sign set from us, it comes with a jig so you can align the “Party of” phrase straight. Be careful to not apply too much glue to the back of the letters, or else you may glue the jig down to the board. I apply a very thin amount to the back of the letter, drop it into its place, then just pick up the jig slightly to ensure it is not sticking to the backboard.

Once all your pieces are glued down as you like it, your project is finished! Essentially, only two to three simple steps: Paint the backboard, paint the letters, glue the letters, and you have your own, unique piece of art to hang on your wall.

How To Make Your Own Family Party Of Sign (1)

Celebrate Your Family

I love that this is such an easy project. Paint it after breakfast and you can have it complete before dinner. This is a great piece of art to be used in your wedding or baby announcements, or to give as a wedding or baby shower gift. Since you are able to really customize this to fit your personality, you can make it an integral piece of your home décor.

If you make a “Family Party Of” sign, we would love to see your finished masterpiece! Share on your social media and tag us – you just may be featured on our page! And if you would rather buy a completed and finished Family Party Of Sign, we have those, too!

Happy Crafting!

Posted on

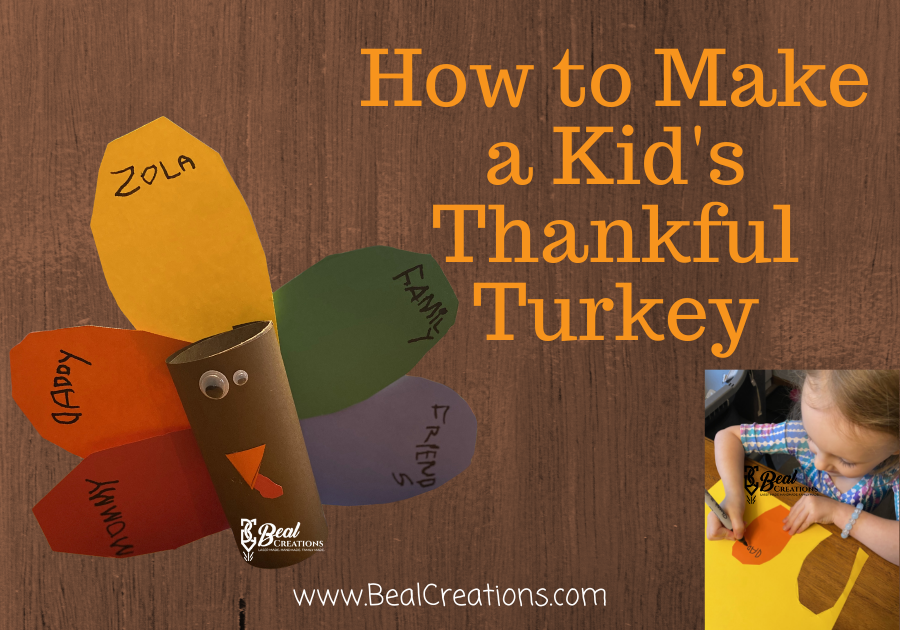
How to Make a Thankful Turkey – Kids Thanksgiving Craft

Kids Thankful Turkey

Our Kids Thanksgiving Craft: A Grateful Turkey

Thanksgiving is the perfect time to remind your children about the importance of being grateful for the things we have. Our daughter has an obsession with making things out of toilet paper rolls, so I decided we would make our kids Thanksgiving craft using one. You can make this Thankful Turkey using materials you already have in your house!

This post contains affiliate links. If you use these links to buy something we may earn a commission, at no cost to you. We only recommend products we use and like. We hope you like them, too! Happy Shopping!

What You Need for your Kids Thanksgiving Craft

DISCLAIMER: Parental supervision is required with all projects. I hope you enjoy the quality time creating memories together!

Thankful Turkey Supplies

How to Make your Thankful Turkey

  1. Cut a piece of brown paper 4″x6″. Roll the paper around the toilet paper roll and glue in place.
  2. Cut a feather out of each piece of colored paper you choose. We used five colors, but feel free to use more or less.
  3. On each feather, have your child write one thing they are thankful for.
  4. Glue each feather on the back of the toilet paper roll.
  5. Draw eyes on your turkey with marker, glue on with construction paper, or use googly eyes.
  6. Cut a small triangle out of orange paper and glue on for the turkey’s beak. We also cut a little wavy piece of red paper to glue on for the turkey’s wattle.

Celebrating Gratitude

There are other fantastic ways to teach children how to celebrate gratitude. Have them write thank you letters to their teacher or postal carrier. Start a journal where they can list people and things they are grateful for each day. There are a lot of great books to celebrate gratitude, also. Check out Llama Llama Gives Thanks, Thanksgiving is for Giving Thanks, or Bear Says Thanks.

I hope you all have a wonderful holiday and can spend quality time together as a family. I am so grateful for each of you who support our family small business, whether that be sharing our posts or making your own crafts with our products. You are on our gratitude list this holiday season and everyday!

Happy Thanksgiving!

Posted on

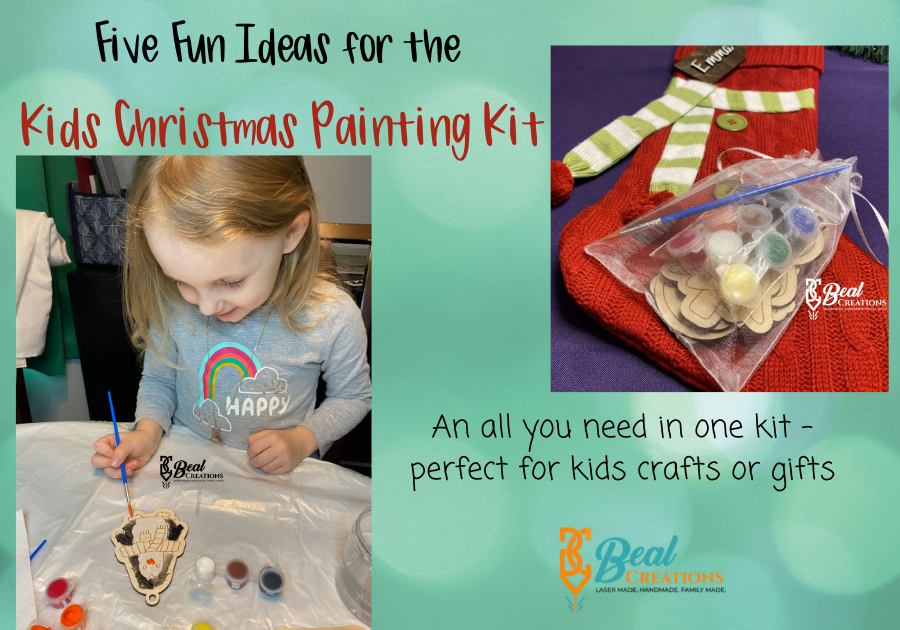
Kids Christmas Painting Kit: Fun Five Ideas

Five Fun Ideas for the Kids Christmas Painting Kit 2

The Magical Kids Christmas Painting Kit

Our daughter has been begging to paint everyday since we cut our first set of the Kids Christmas Painting Kit. As she started in on kit number two, I began to consider what we are going to do with all of these new pieces of art. Surprisingly, I was able to think of a lot of fun ideas for the Kids Christmas Painting Kit!

This post contains affiliate links. If you use these links to buy something we may earn a commission, at no cost to you. We only recommend products we use and like. We hope you like them, too! Happy Shopping!

What is this Kids Christmas Painting Kit, anyway?

So glad you asked! The kit contains cute Christmas themed cutouts from Baltic Birch wood and everything your kid needs to paint them. The small set includes six cutouts and one paintbrush while the large set includes 12 cutouts and two paintbrushes. Each set comes with nine paint pots and a string of Christmas twine for each cutout.

The large kit with all 12 pieces.

We laser cut the wood and added score lines. The score lines make it easy for kids to “paint in the lines,” opposed to a blank cutout. They make great Christmas crafts or even stocking stuffers. These work well for all ages; I would recommend starting once your child is beginning to color in the lines, but as long as you don’t expect a masterpiece and you are supervising, you could start even younger. Older children will also enjoy painting these, and they even make wonderful activities for older adults, especially those in nursing homes.

DISCLAIMER: Adult supervision is required with all projects. I hope you enjoy the quality time creating memories together!

Fun Idea #1: Ornaments

This is one of the original purposes of the Kids Christmas Painting Kit – it is Christmas afterall. Each set comes with Christmas twine so after the paint dries you already have what you need to get them up on the tree. One idea I have is to let our daughter paint 1-2 each year that are dedicated for our tree. I think it will be really fun to see the progress she makes in her artistic abilities each year. She currently does a good job at coloring in the lines, but painting in the lines is a little bit different. I am interested in seeing her improvement between this year and next.

Don’t forget to write the year and your child’s name on the back of the ornament. This way it becomes a wonderful keepsake you can both look back on.

Fun Idea #2: Gift Tags

This is the other original purpose of the kit. The included Christmas twine can be used to tie the tags to gift bags. Let your child decide who each gift tag is for before painting so they can make them special for each person. You or your child can easily write the gift recipient’s name and your child’s name on the back. This is a fun way to bring some personality to your gifts this year.

Kids Christmas Painting Kit as Gift Tags

My mom came up with a fun idea as well. She is using some of the gift tags that my daughter paints as name tags on her own gifts. That will be such a fun surprise for her on Christmas morning. I know she will get a kick out of seeing her own painted gift tags on her presents.

Fun Idea #3: Garland

Since these ornaments already have the holes in them, you can also repurpose them as a garland. I plan on stringing a set of 12 together and hanging near the window. I love adding a personal touch to our decorations, rather than the traditional store bought decorations. My plan is to use the same Christmas twine that is included in the kit, except I will use one long piece. I bought mine from the local craft store; however, this twine looks like it is the same if you are trying to find some.

Fun Idea #4: Imaginative Figures

These ornaments are the perfect size to use for imaginative play. We took the Santa, elf, and reindeer and played out a story using them. My daughter is at that fun age where she comes up with some pretty silly stories. I love listening to what she comes up with, and these ornaments act as perfect little figures to host our story. Of course, these are not toys and adult supervision is required when being used by kids.

Fun Idea #5: Daycare/School/Parties

These make perfect gifts for themed parties. Each kid gets to paint one to take home with them. If at a school or daycare, you could get a little tree for the classroom and each kid can hang their ornament on the tree until Christmas break. Then they can take their ornament home to put on their own tree. They also work well for the kids to make and take home as a present to their parents or other family member. If your kid’s class passes out little treats or gifts to each other, your child can give one to each kid as their gift.

If you have any connection to nursing homes, this would also be an ideal gift for their activities center. I worked at an amazing nursing home for several years in my younger days and they were always doing fun little crafts like this. Each resident can paint their own ornament and hang it in their room or on a community tree. They could even give it as a present to their grandchildren – that would be so special!

What Will You Create with your Kids Christmas Painting Kit?

I hope I was able to inspire you with some fun ideas for your kids. If you decide to make something with these, we would love to see! Share on any of our social media handles below and use the hashtag #BealCreations. You may even get featured on our page!

Happy Crafting!

Posted on

Something BIG is Coming…Can You Guess What It Is?

We are starting a new chapter in our lives and cannot wait to share it with you all! This is something we had talked about for awhile before deciding to take the plunge. We really wanted to build a business for our family, something that we would enjoy doing together and a passion we could share with our daughter. We decided it was time and told our family and friends, something big is coming! Can you guess what it is?

So the Journey Begins

If you follow us on social media (which you really should!), you saw the beginning of our story unfold. What you may not know are all of the gritty details. What was supposed to be an easy FedEx delivery into our garage on a Friday turned into Chris and his dad having to go pick up our delivery from the loading dock on Monday. Mind you, this isn’t as easy a feat as it might sound. While our purchase was heavy enough, weighing in at just under 200 pounds, the total weight including the crate and packaging weighed over 500 pounds.

When the freight truck arrived at our house on Friday, they could not get the gate down. We tried several ideas, moving it to a different position on the street, backing into our driveway, not lowering the airbags, nothing worked. The gate was hitting the road and so the ramp would not lower. There was no way of moving that 500 pound crate off a large freight truck with no ramp. We had no choice but to let the driver go and call FedEx for options. Chris spent a couple hours on the phone that day trying to figure out how to get it to our house. Since they wanted to charge us to have a third party freight truck “rescue” our package and deliver it, after we already paid a pretty penny for shipping, we had to find another option. Thankfully, Papa Beal stepped in to save the day and offered to use his truck to pick it up from the dock…when they opened again on Monday.

Picking Up Our “Delivery”

Chris and his dad drove over to FedEx on Monday to get our package after what felt like the longest weekend ever. Mind you, we thought we were going to have it on Friday and be able to start testing all weekend. FedEx loaded it onto the truck bed and home they came, getting stuck in deadlocked traffic, of course. Now comes the tricky part – how to get a 500 pound package out of a truck. Naturally, first came the uncrating; it is much easier to unload 200 pounds than 500 pounds. Then all three of us, ever-so-gently, eased our precious cargo out of the truck using a sheet of plywood. It was terrifying! One wrong move and everything would come crashing down, quite literally.

Thankfully, it slid down safely and all was well. It wasn’t easy…but we were successful. Now, to get it in the house. Not just in the house, but also down an entire flight of stairs and into our workshop in the basement. Chris already has a set up down there for his 3D printing and we had the perfect spot just waiting for our new equipment. Two of Chris’ friends came over, loaded it onto a furniture dolly, and helped him get it downstairs. We are beyond grateful to them and Papa Beal for their help, as we would never have been able to accomplish this ourselves.

What’s in the Booooooox???

Did you picture Brad Pitt when you read that sentence? Because I picture that iconic movie scene every time I ask that question. Hopefully you have seen our story on social media and looked around our page so you know by now what was in the box. We are more than happy (and nervous and anxious and overjoyed) to announce that we now have a laser! Beal Creations will be specializing in laser cutting and engraving to bring all your ideas to life! Whether you are looking for some DIY craft supplies or custom made gifts, we can help! You will also want to make sure you stay in contact with us as April will be sharing design ideas – everything from holiday and home décor to kids activities. We are here to offer you inspiration to let your creative side reign! If your creative side isn’t so bright, we are also happy to help design the perfect custom gift for you – just tell us basic information like important names and dates and we will do the rest.

Building a Community

We are so excited to truly build a community around the love of handmade art. April has always loved planning and crafting and Chris has always loved working with his hands to build something wonderful. If you haven’t checked out our About Us section yet, we’d love for you to head on over and get to know more about us. We hope you see us as friends and members of your crafting family. If you have any questions about custom gifts or suggestions on projects you would like to see, leave us a message on our Facebook Page or through our Contact Us anytime.