Despite how hot it has been, we are so excited for summer! We are welcoming summer with our Hello Summer sign and giving you all the details on how you can make your own with our DIY Kit.
What is in the DIY Hello Summer Sign Kit?
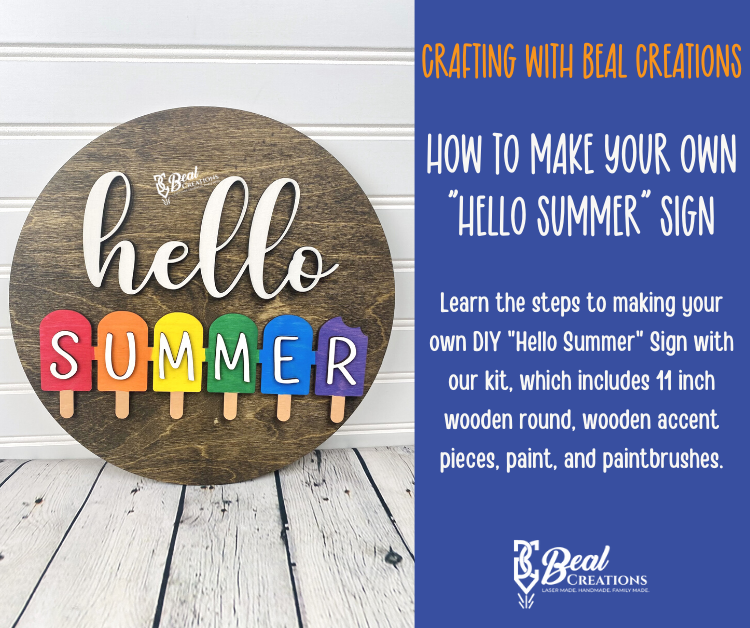
Our DIY Hello Summer Sign Kit will include all the wooden pieces you need to make your sign. We have also included paint for the accent pieces and paintbrushes. Here is everything you get:

- Wooden 11″ Round made from 1/4″ Baltic Birch wood
- Wooden accent pieces, including
- “hello”
- “summer”
- popsicles
- Eight acrylic paints
- Paint brush and foam brush
Two items not included are the paint/stain you choose for the 11″ round and glue. Some people like the stained round while others like it painted, choose whichever medium most fits your style. We recommend a strong craft glue or super glue.
Staining and Painting Your Sign
After you have collected all your supplies, ensure your workspace is properly set up and you have any necessary protective gear. Lay down some kraft paper or old cardboard boxes to protect your workspace, work in a well ventilated area, wear gloves, etc. Once you have prepped your work area and ensured you have all your supplies, you can begin crafting!
Start by staining/painting your wooden round. Never stained before? It is nothing to be intimidated about! Just make sure that you are going with the grain when you apply. Make sure to check out our DIY video to see how we did it. Once you are finished, place the round to the side to dry.

Begin painting your accent pieces. You can use either the paintbrush or foam brush included in your kit, or both! It is all a personal preference. My preference is to use the foam brush for all the pieces except “summer”. I like to use paint markers for small pieces like “summer”; however, if you do not have paint markers, I suggest using the paintbrush for thinner strokes on “summer.” I decided to use white for the words and paint the popsicles in a rainbow theme. There is enough paint included for you to do a couple coats of the same theme, or mix it up and do something completely different!


Assembling Your Sign
When all the pieces are fully dry, you can begin assembly. Glue the “hello” and popsicles onto the round. You will notice the light scoring on the wooden round; this scoring acts as a guide to help you align the pieces onto the board straight. Once these pieces are secure, begin attaching the “summer” onto the popsicles. Careful not to use too much glue as it will seep over the sides and leave residue on your sign.
If you chose the option with holes, gather your favorite twine or ribbon and lace through the holes and tie a knot. Your sign is ready to be displayed!
Excited to Welcome Summer
We are so happy to welcome summer in our house. We have undergone some changes and we are excited to begin this next chapter in our lives. We have been adding a whole slew of items to our summer bucket list. What is your favorite thing to do during summer? Tell us below, or feel free to share on our Facebook Page or tag us on Instagram, along with a picture of your beautiful new sign! We love seeing our customers’ creations!
Happy Crafting!
