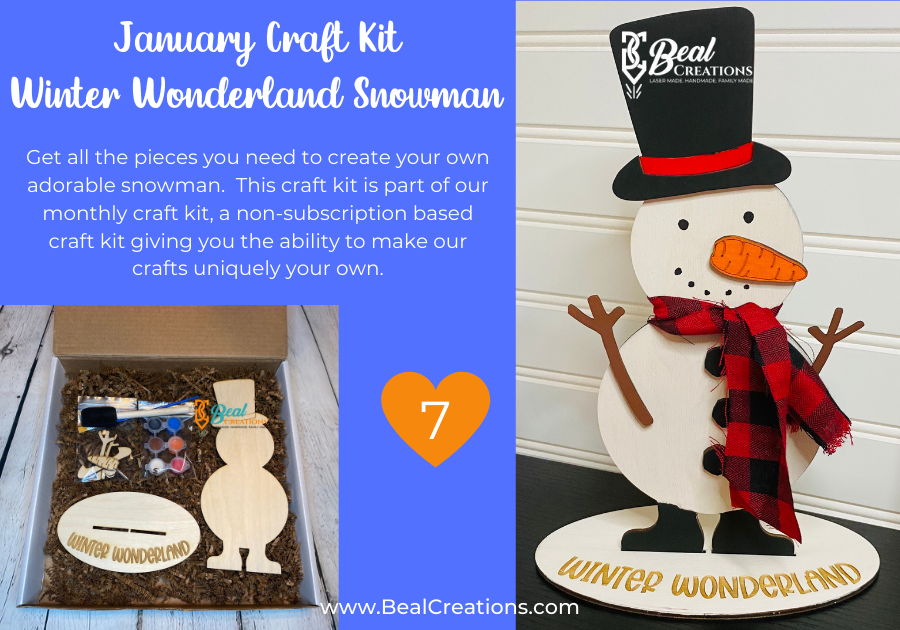
This month’s DIY craft kit is the Winter Wonderland Snowman. Get everything you need to make your own snowman at home. This is a fun and easy craft for older kids and adults.
One DIY Craft Kit – All Your Supplies
First, order your January DIY Craft Kit. When you receive your box, unpack all of your pieces to make sure you have everything. Your kit will include:
- Snowman
- Hat brim
- Carrot
- Three buttons
- Two branch arms
- One fabric scarf
- Six acrylic paints
- One foam brush
- One paintbrush
One thing your kit will not include is glue. You can choose whatever glue you feel safest using – the tacky glue which you can find at Wal-Mart works great on DIY projects. Whichever glue you chose to use, please use caution. While this craft is great for both adults and older kids, please ensure adult supervision if being completed by a kid.
Painting Your Snowman
Begin by painting your snowman. You can paint a traditional snowman, like mine, or feel free to use other paints or mediums you have at home to make something truly unique. After painting the snowman, paint the trim of the hat, which I painted red to pair with the red in the scarf. Then, paint the hat and boots.
When finished with the snowman piece, begin painting the rest of the smaller wooden pieces. Set everything aside to dry.
You can also decide to paint the base, or leave it natural if you like the wood look. For my piece, I painted the base white. If you take the foam brush and just lightly paint over the engraved words, the paint should not seep into the engraving. I was going to fill in my engraving with blue paint, but I ended up liking the engraved wood showing through and decided to leave as is.
Assembling Your Snowman
Once all of the wooden pieces are completely dry, you can begin gluing them together. How and where you attach each piece is your choice, for example, maybe you want the branch arms pointing down. When you have each piece attached, find the fabric piece. This will become the snowman’s scarf. I folded my fabric in half length-wise, then tied it around his neck. I only knotted it once, since this is a décor piece and it doesn’t need to be on tightly. You may also decide to cut the ends to give the scarf some fringe.
At this point, you can paint or draw a face on your snowman, if you want. I used our Posca Paint Pens, but you can use the black acrylic paint that came with your project or even a normal marker.
Check out the video below to see a quick step by step of how I made my own snowman.
Your New Winter Friend
You are now ready to stand your snowman up by placing him in his base. The snowman stands approximately 10-inches tall. He is such a cute addition to our shelf. Since he is not Christmas themed, we can keep him up all winter. In Ohio, that can last awhile…it has snowed on my birthday in past years…in APRIL! That’s a little too long of a winter for me.

Once you have completed your Winter Wonderland Snowman, I would love to see it! Make sure to post a picture on our Facebook page and let us know you have completed the Monthly Craft Kit. We really enjoy seeing everyone’s creations. If you are looking for more inspiration for future crafts, be sure to follow us on social media.
Happy Winter!


A lovely craft project to do with children and have something to keep and bring out each winter.
Thank you! It would be a fun craft for a child and parent or grandparent to do together – a cherished memory to reflect on each winter 🙂
Love this craft!!
Thank you!
This is adorable and I love that it’s the craft for January. Too often folks ditch the snowmen after Christmas, but we’ve got at least 2 months of snow after that! Well, at least we do here in Virginia 🙂
Thank you! I agree, we are in Ohio and we have snow into April some years! We get so sad when all the Christmas decorations get packed up, it is nice to have some winter decorations stay around and the snowman is perfect for us!
This sounds like a fun thing to do with kids especially in the winter. Thank you for sharing.
Thank you! If you make one, we’d love to see your masterpiece!